
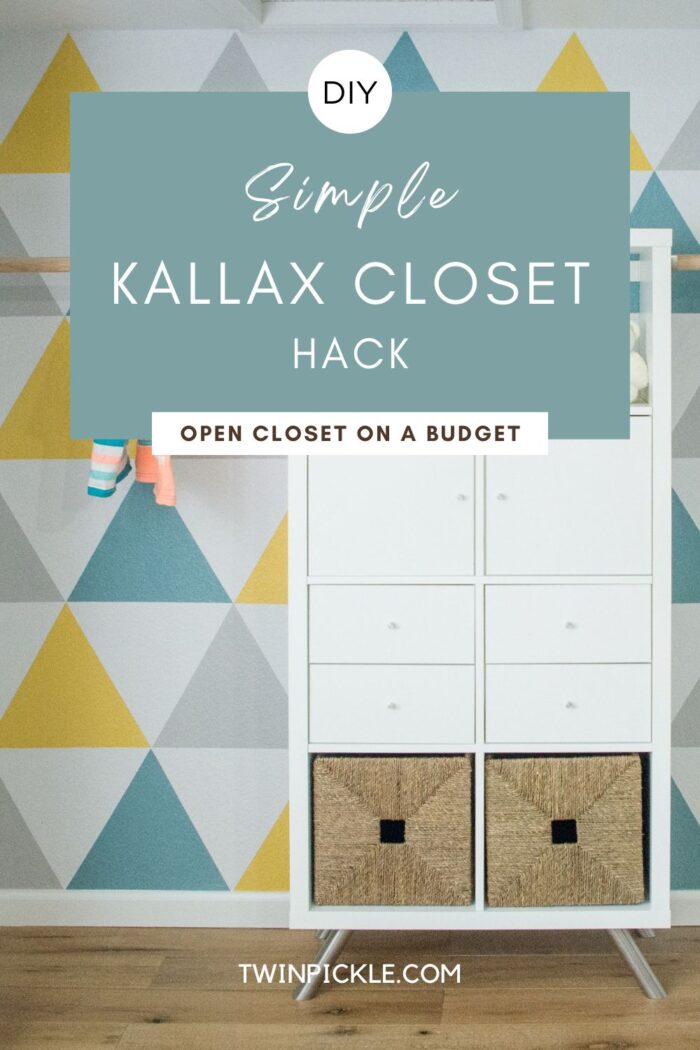
Custom fitted closets are beautiful, but not always in the budget. This time around, DIY closet it is… I’m putting my mom muscles into action and taking on this project to create an attractive, practical and affordable solution. This IKEA Kallax hack has turned out great… and was very kind on the wallet!
**This post contains affiliate links. This means I may get a small commission if you decide to purchase from a store I link to. It does not affect the price of the item.**
I’ve been talking about getting started on the Twins’ room for long enough, so I thought I’d better get on with it and break the seal. It’s a lot to take on at once, especially when you’re at home with three kids. So I’m breaking it down into manageable pieces, starting with their closet.
DIY Custom Closet: BEFORE
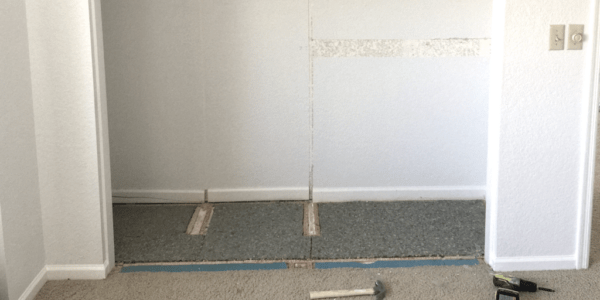
The existing closet and it’s sliding mirrored doors have likely been there since the house was built in 1987. We have these closets in three of the rooms in our house and it’s tempting to just leave them. But I find the sliding doors limit access to the full area of the closet, and the open shelving ends up a jumble of falling socks and crumpled t-shirts. I can not stand using the closet they currently have, and I’m pretty sure the one in their new room is even worse.

So… time to take action and rip it all out. It really is amazing how much material comes out when demolishing a fitted closet. I’ll be honest, I haven’t yet dealt with disposing of all the shelves and doors. What I didn’t consider, was the fitted system that was there ran down to the floor and the closet had been carpeted around it. This meant the carpet had to come out too, such a pain! I didn’t have any matching off-cuts of carpet to fit, but I did have a little leftover oak flooring from when we installed downstairs, so oak flooring it is. A blessing in disguise, as I think it looks fab, despite the extra work.
Before I could get started on my IKEA Kallax hack, I had to:
- Strip out what was there;
- Fill holes, sand and decorate walls;
- Install new flooring;
- Install and decorate new base boards.
IKEA Kallax Hack
The IKEA Kallax system has been a best seller for years, and over time new nifty additions have been offered to make the system even more versatile. I knew I wanted some drawers for the Twins’ closet, and although the drawers offered for the system are small, they will be perfect for socks, underwear etc. I am very aware from their existing closet, it is difficult to keep clothes eye pleasingly, OCD tidy; so I wanted some cupboards/boxes to hide things, especially as I decided to leave the closet open. You can mix up your Kallax unit however you want, you may want to just keep it simple with some storage boxes. And if you live nowhere near IKEA, ClosetMaid make pretty identical units. There are alternatives to IKEA… ClosetMaid and Better Homes & Garden also make cube storage units.
[easy-image-collage id=3037]You can just leave your Kallax unit on the floor, but I felt lifting it up on feet gave it a wardrobe feel, and a more ‘finished’ appearance. It also gave me a little more height for fixing my clothes rail to either side. The unit is quite heavy, so I do recommend heavy duty legs with a decent fixing plate to spread the weight. I used IKEA Capita brackets, which are designed for holding up kitchen shelves/worktops rather than furniture feet, but they worked out perfectly. Unfortunately, since my install, they seem to have discontinued the slanted supports but you can still find them on Amazon. You can use any legs you like, there are plenty of different styles around! Then, all that’s missing is a closet rod and brackets.
[easy-image-collage id=3044]Closet Mural
A little while ago I posted about murals for kids rooms that do not need a fine art degree… and this mural was simple, but time consuming. It requires a streak of the perfectionist and a bit of patience, but it does not require any special skills. You don’t need to paint a mural behind your DIY custom closet, but if you’re going to go custom… go all the way, right? For extra crispy lines, seal the masking tape with the background paint, before painting over with your color. I tried with and without this extra step, and I can confirm it is 100% worth that little extra time. If you’re painting smooth walls, you’re probably OK, but with textured walls, that coat of paint fills the gaps beneath the tape, preventing edge bleeding. If you can’t quite face a complex pattern, how about a bold feature color as a backdrop to your closet?
So… to prevent babbling instructions on the mural and the IKEA Kallax hack, I made a video:
DIY Custom Closet: AFTER
I’m really pleased with how the closet turned out, and the symmetry is perfect for the twins, because as I have mentioned before, I like to keep their clothes separate. George and Arthur will get a side each, and there is plenty of space to spare if I want to pop a laundry basket or storage trunk on either side at floor level.
This DIY custom closet cost me a total of $250 (not including repairs/flooring after demolition), which is a fraction of the cost a closet company would charge. And if you went with basic cube boxes, instead of drawers and cupboards, and kept the unit on the ground, you could pay as little as $150… feeling like a thrifty mama right now!

.

I’d love to hear what you’ve done with an IKEA Kallax system… the possibilities are endless!
22 responses to “DIY Custom Closet: IKEA Kallax Hack”
Wow, what a transformation. I’d love to try something like this. Loving the color palette too!
Thanks! I have a yellow accent chair and a grey wall opposite the closet so I was trying to work with what I’ve got 🙂 So glad you like it!
Ok, this genius! I love ikea as well, so this is a win win! Seriously going to do this for my kids’ closets ?
Who doesn’t love IKEA?! Except on saturdays ??
This project came out so great! I can’t wait to revamp my daughter’s closet using your tutorial. Thank you!
Thanks, I’m pretty pleased with it, and such a cost saving for the room budget!
I love it so much!! How cool is this!?
Thanks! ?
Can I hire you to come over and revamp all of our closets too? I hate our completely inefficient and builder grade closets.
Thanks for the inspiration, though, maybe I’ll add it to the end of my hubby’s very long to-do list…
Haha! I have one of those lists… but unfortunately my husband is not safe with a screwdriver. The last time I persuaded him to help he drilled straight through a water pipe! ???
This is awesome! Now I want to redo my closet! IKEA has that effect on me….
IKEA is a definite addiction ??
Omg I love this!!! Your style is always so beautiful and elegant! Plus we have an IKEA right down the road. Win, win, win!!!
Thanks Sarah! I’m not sure what I’d do if IKEA was too close… too tempting for a ‘browse’ (which means filling one of those yellow bags to the brim with stuff you never knew you needed immediately) ?
That is unbelievable! I love the Ikea Kallax and this is so unique! Thanks so much for sharing!
Thanks Annie!
The possibilities really are endless! I love these cube systems! We have a couple in the boys room and just refinished all the kids closets with another IKEA system! It feels so great having an organized closet system in place!
Closet organisation does make you feel very accomplished! Probably only topped by filing paperwork but much more fun! ?
[…] For the complete tutorial of the custom closet, including that fabulous wall mural (yes, it’s not wallpaper!), head over to Twinpickle. […]
Love this! Can I ask what colors you used?
I’m so glad you like it! I dug our my paint cans but unfortunately can’t find the blue… such a school-boy error not writing it down, lol. Anyways, the yellow is Behr brand: Mayapple Yellow and the grey is Behr brand: Pebble Grey. I hope that helps a little!
[…] Katherine Betts is the creative behind the TwinPickle blog, a ‘creative outlet for design inspiration and ideas on motherhood’ where she shared this IKEA […]